MS Teams for Teachers
MS Teams for Teachers
To join an online lecture in Microsoft Teams, you need to take the following steps:
1. Download the Teams app for your personal device here. (You can also use the web version at teams.microsoft.com , but it has lower functionality). The MS Teams app is automatically installed on work devices at FSV where you log in with your CAS login data.
2. Log in to the app with a username in the following format: “yourIDnumber@cuni.cz.” The password is the same as for SIS.
HOW TO SET UP A TEAM IN MS TEAMS
All clear procedures for setting up a team in MS Teams can be found at https://dl.cuni.cz/wp-content/uploads/MSTeams_trida_.pdf . They draw on the Charles University e-learning support centre https://dl.cuni.cz/ms-teams/ where you can find further links for working in MS Teams in the "How to work in MS Teams" section.
Recommendations for FSV:
- In order to maintain the terminology, we recommend naming the team with the course name without diacritics and place its code in parenthesis.
- You can then change the team’s name by clicking on the three dots and add the diacritics via the “Edit Team” option.

HYBRID CLASSES IN THE WINTER SEMESTER FOR FIRST-YEAR STUDENTS OF INTERNATIONAL DEGREE PROGRAMMES
PLEASE NOTE
For individual courses that are intended for hybrid classes of the first-year students of international degree programmes in the winter semester, MS Teams are set up centrally through OCJSP/the International Degree Programmes Office. The procedure for activating individual teams and starting lecture rooms has been emailed to the teachers of the respective courses and is available upon request from OCJSP. Please do not set up your own Teams for these courses!
INFORMATION ABOUT SETTING UP TEAMS VIA SIS
Information about setting up Teams in MS Teams via SIS will be added here in the nearest future.
HOW TO SET UP ONLINE MEETING IN TEAMS
After logging into Teams you are in the cloud version, but it is also advisable to download Teams to your device and run the program directly there. The following window will appear.

Go to the calendar and set up the required meetings, inviting at least one attendee, to get a link to Teams video calls for specific exam or class dates. This calendar at FSV UK is not linked to your Google calendar as you are used to. Still, to generate a link for video calls, the above procedure is essential.
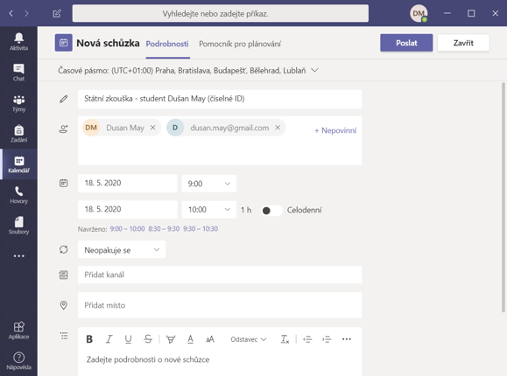
You can invite the student and other participants (e.g. other examiners) to their email in the domain or generate at least one name (where at the bottom you can send a message about a new meeting) and send (top right).
This sends a message to the specified user and when you open the set-up meeting, you will find a link to the video call in Teams at the very bottom of the window. This link can simply be copied and pasted into an email that you are ready to send out as part of an exam or a class. If this is a state examination, you will need to ensure (see procedure above) that you always have a new link so that the video call is not interrupted by another student whose exam will follow.
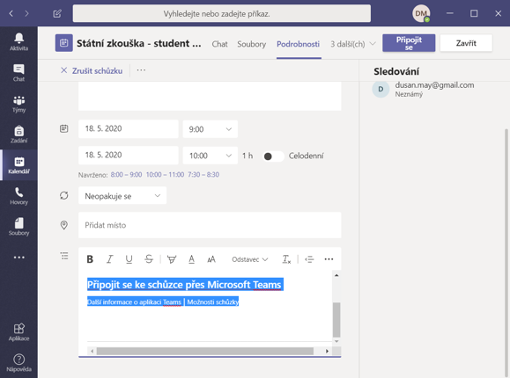
To copy the link, just highlight the above sentence “Join a meeting via Microsoft Teams” and right-click to copy the link.
HOW TO MAKE A VIDEO CALL
When the video call is to take place, the creator of the meeting starts the video call by going to the Teams calendar, finding the meeting, opening it and clicking on “Join” at the top right. This secures connection and the creator just waits for the attendee or attendees to join.
First, a window will appear before the actual connection (it is recommended to choose the right device with the necessary camera or microphone to make the video call). In this step, the video camera will be tested to see if it works, or a window will appear asking you to allow the use of the camera and microphone. In the proposal of the Rector's Office of Charles University regarding the state examination, it is recommended that at least the examiner is seen on camera so that the student has visual contact and is not disoriented. For the student being examined, visual contact is self-evident. Then click on the option “Join.”
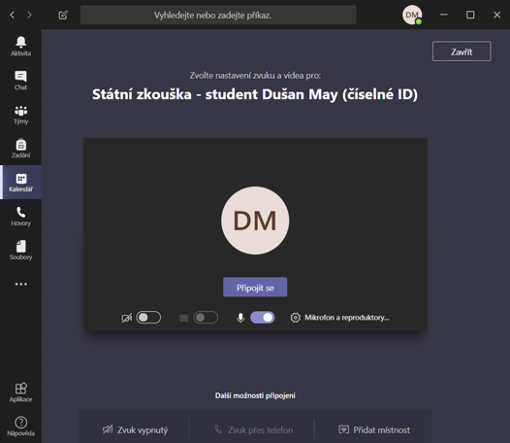
The connection and audibility will now probably be checked and if there are technical problems it is good to have everything tested beforehand. Also consider that the student may not have a good Wi-Fi connection and therefore the video image may not be ideal for these reasons.
A new window will appear waiting for attendees to connect. We will now focus on what the students see. The students will see a message sent by the teacher in their email with the meeting and time and also a click-through to this video call. If only a link was sent out via email and you sent information in the text about when and what time the meeting or exam takes place, the students will be shown information about whether they want to be connected as a guest or if they log in with their login and password. Both ways are possible. If the students log in as guests, they will just be asked to enter a name (preferably their full name) so that they can be identified in the video call when communicating. In this case, the student will not get into the video call until the examiners have first connected themselves.
HOW TO RECORD A VIDEO CALL
After the initial introductions and information, make sure to inform the student that the call will be recorded. The recording icon can be found under the three dots “Start recording.”
From now on, the video call will be recorded. Information about this will appear in the top bar for both the student and you. If the students do not agree to this they will have to end the video call.
If the examination time elapses (i.e. the preparation for the exam and the act of examining itself) before you end the meeting, you need to go back to the three dots in the top bar of the video call and click on “Stop recording.”
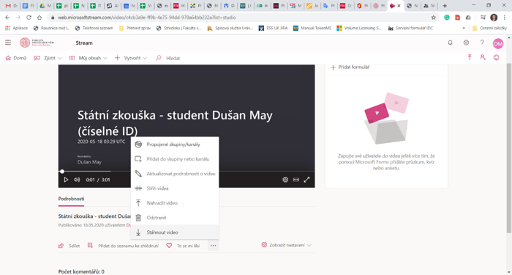
This is automatically saved to the Stream, but you can find a record of it in Teams when you click on “Chat.” Here is the video you recorded and the student can see it as well. At this point, click on the three dots next to the video and the option “Open in Microsoft Stream” will appear.
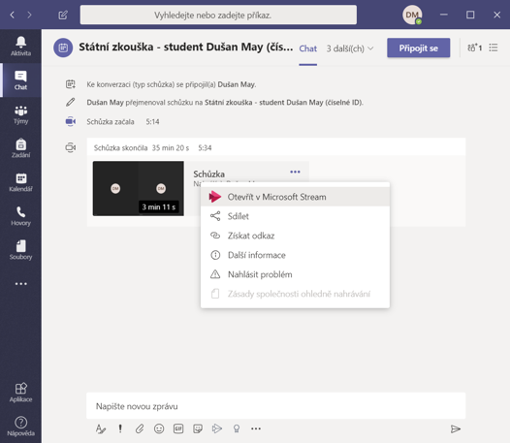
Then the Stream app opens directly and there is an option to download the video in MP4 format for subsequent use wherever you choose.
Also, for the purposes of, for example, a state examination, the video must be inserted into the filing service, which is provided either by the secretariat of the institute or by the staff member of the student services office. The videos collected in this way (and properly labelled so that it is possible to identify with whom the examination was recorded) can then be stored at your discretion.